The holidays are over and not only do you have a fridge full of leftover food but you've probably got a lot of wrapping paper too, from gifts you've received.
So, what can you do with leftover wrapping paper?
1) Recycle it. Make sure to remove the tape or other items that might impede the recycling process. (Remember, some paper is dyed, laminated and/or contains non-paper additives like glitter and plastics which cannot be recycled.)
2) Save it for next year. If your wrapping paper isn't ripped up, it can be reused again!
3) Shred it. Shredded paper is often used as puppy and kitten bedding in animal shelters. Call your local shelter to see if they'll accept your shredded paper as bedding!
4) Pack it. Use crumpled or shredded wrapping paper to pack fragile items away for storage (like Christmas ornaments!) or when sending items through the post.
5) Litter! It's not what you're thinking... some papers can be turned into kitty litter. Here's a tutorial!
6) Compost it. Some papers can be composted (note: glossy, heavily inked papers cannot) - here's how.
7) Get crafty. Plenty of decoupage and paper mache projects can come directly from your used wrapping paper!
Happy New Year!

Tuesday, December 27, 2011
Monday, December 5, 2011
Wrap it Up!
The holidays are just around the corner, and I'm sure that just like us you've got a mound of presents that are just waiting to be wrapped and put under your tree. My thought this holiday season is: how do I not contribute to the wasteful use of paper? Last year I remember passing by trash bins overflowing with wrapping paper after Christmas, telling myself that I would find more creative ways to wrap my gifts. It seemed like a sad after-effect of the holidays - to boot, most gift wrapping can't be recycled, and those that can be recycled generally aren't. According to Eco-Chick.com,
if every American family wrapped just three presents in reused
materials, it would save enough paper to cover 45,000 football fields.
So, reused materials. I've found some great ways to wrap of those gifts in style to make them the prettiest and most eco-friendly presents under your tree.
And make your own bows! If you have leftover wrapping paper or even just old magazines, you can create these beautiful bows very easily!

Here's a tutorial on how to make these super cute spiky bows

And one on how to make the "standard" bow
If you must use wrapping paper, please make sure it's recycled. Here's some tips on wrapping paper from Earth 911.
Happy wrapping!
So, reused materials. I've found some great ways to wrap of those gifts in style to make them the prettiest and most eco-friendly presents under your tree.
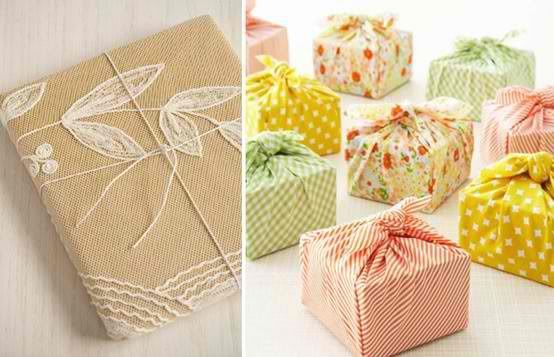 | |
| Wrap it with fabric! Perfect for smaller gifts, especially jewelry boxes. Remember, fabric can also come from old tee-shirts or sweaters. |
 |
| A doubly-useful gift? Use a scarf! |
 |
| Maps! They're colorful and fun. Try comics and newspaper too! |
And make your own bows! If you have leftover wrapping paper or even just old magazines, you can create these beautiful bows very easily!

Here's a tutorial on how to make these super cute spiky bows

And one on how to make the "standard" bow
If you must use wrapping paper, please make sure it's recycled. Here's some tips on wrapping paper from Earth 911.
Happy wrapping!
Tuesday, November 29, 2011
How to Have a Successful Etsy Shop!
Do you want to make a little extra money selling your awesomeness? Or do you already have an Etsy (or other crafty site) shop and need a few extra tips to help encourage sales? I've put together a few ideas to help both beginners and those who need a little push in the right direction.

Determine what it is that you do well. Do you knit? Are you a photographer? Maybe you make miniature buildings perfectly to scale, screen-print tee shirts, make pins, birdhouses, wire sculptures, jewelry; everything has a market! If you lack ideas, look online for help to get you started (Pinterest is an AWESOME place for inspiration!). If you have more than one crafty hobby, pare it down to just one - for now - to make starting easier.
Perfect your craft. Use your own items for a few weeks to see if they have any flaws, and you can also loan out or give away some to friends and family for them to do the same. If you find any flaws in your product, remake or fix the product and try the process again. You want to make sure that when customers purchase your product that they’re getting the best quality for their money (and of course that they become repeat customers and leave good reviews!)
Take pictures of your items. If you’re a great photographer or have an eye for a good photo, you can take your own photos. If not, recruit a friend or even outsource the job; good visual representations of your products are essential! If the pictures don't truly match the colors of the product, try different lighting to accurately capture it (natural sunlight is best). No camera phone pictures allowed!
Write great descriptions of your products. Make sure you add how they were made, the materials used, their size, etc. Don’t leave any detail out! Some potential buyers won't be motivated to contact you for additional information, and may just move on to a similar product <-- no good!
 List them for sale. There are many online
marketplaces that allow individuals to sell their art: ArtFire,
BuyHandmade, Dawanda, Folksy, Etsy (the largest), Craftster,
Coriandr, Misi, All Things Original – the list goes on and on
(expect to pay a small listing fee and/or a percentage of the sale
price to the site).
List them for sale. There are many online
marketplaces that allow individuals to sell their art: ArtFire,
BuyHandmade, Dawanda, Folksy, Etsy (the largest), Craftster,
Coriandr, Misi, All Things Original – the list goes on and on
(expect to pay a small listing fee and/or a percentage of the sale
price to the site).
Market your products. Put your social media skills to use – share the link to your online store on facebook, set up a twitter account to spread the news of new additions to your site, start a blog linking to your site, even kickoff the opening of your online store by doing a feature on a popularly read blog or website including a giveaway. Get people talking (and retweeting, sharing, etc.)!
Give stuff away. Sometimes having your items in an auction gift basket for your favorite charity can be a great way to spread your store name. Even just one item every few months can bring you more customers over time.
Communicate with your customers. When you start making sales, make sure to send a small note to your customer saying “thank you!” and marking the item as “shipped” as soon as it is in the mail. Also ensure to leave positive feedback for your buyers (assuming it was positive) welcoming them back in the future. If you fail to receive feedback on a sold item, follow up with a message to the buyer asking them if they’ve received the product and if everything is okay. Great customer service is key!
 Spread out. Create some business cards
with your shop web address and contact information and look for
local art/craft fairs and shows, festivals, etc. where you could
potentially sell your products. If the cost of having your own
booth or table is too costly, try finding another crafter (or two!)
that might be willing to split the table with you. Additionally, try
contacting locally-owned stores who might be interested in carrying
your product for a percentage of the sales.
Spread out. Create some business cards
with your shop web address and contact information and look for
local art/craft fairs and shows, festivals, etc. where you could
potentially sell your products. If the cost of having your own
booth or table is too costly, try finding another crafter (or two!)
that might be willing to split the table with you. Additionally, try
contacting locally-owned stores who might be interested in carrying
your product for a percentage of the sales.
Want to SUPER kick-start some sales online? Look for those who have "liked" your items, added your shop to their favorites or previously bought your products and send them a coupon (online) for x% off any item in your shop.
Good luck and happy crafting!
Picture credits: Clancy Ratliff, Gordon Hatton

Determine what it is that you do well. Do you knit? Are you a photographer? Maybe you make miniature buildings perfectly to scale, screen-print tee shirts, make pins, birdhouses, wire sculptures, jewelry; everything has a market! If you lack ideas, look online for help to get you started (Pinterest is an AWESOME place for inspiration!). If you have more than one crafty hobby, pare it down to just one - for now - to make starting easier.
Perfect your craft. Use your own items for a few weeks to see if they have any flaws, and you can also loan out or give away some to friends and family for them to do the same. If you find any flaws in your product, remake or fix the product and try the process again. You want to make sure that when customers purchase your product that they’re getting the best quality for their money (and of course that they become repeat customers and leave good reviews!)
Take pictures of your items. If you’re a great photographer or have an eye for a good photo, you can take your own photos. If not, recruit a friend or even outsource the job; good visual representations of your products are essential! If the pictures don't truly match the colors of the product, try different lighting to accurately capture it (natural sunlight is best). No camera phone pictures allowed!
Write great descriptions of your products. Make sure you add how they were made, the materials used, their size, etc. Don’t leave any detail out! Some potential buyers won't be motivated to contact you for additional information, and may just move on to a similar product <-- no good!
Market your products. Put your social media skills to use – share the link to your online store on facebook, set up a twitter account to spread the news of new additions to your site, start a blog linking to your site, even kickoff the opening of your online store by doing a feature on a popularly read blog or website including a giveaway. Get people talking (and retweeting, sharing, etc.)!
Give stuff away. Sometimes having your items in an auction gift basket for your favorite charity can be a great way to spread your store name. Even just one item every few months can bring you more customers over time.
Communicate with your customers. When you start making sales, make sure to send a small note to your customer saying “thank you!” and marking the item as “shipped” as soon as it is in the mail. Also ensure to leave positive feedback for your buyers (assuming it was positive) welcoming them back in the future. If you fail to receive feedback on a sold item, follow up with a message to the buyer asking them if they’ve received the product and if everything is okay. Great customer service is key!

Want to SUPER kick-start some sales online? Look for those who have "liked" your items, added your shop to their favorites or previously bought your products and send them a coupon (online) for x% off any item in your shop.
Good luck and happy crafting!
Picture credits: Clancy Ratliff, Gordon Hatton
Thursday, November 10, 2011
...Soap, Are You Nuts?
As I am an anti-chemical kind of girl (and I mean that in a made-in-a-factory chemical way, I do realize that chemicals are a natural bond of elements and water technically is a chemical, but you know what I mean). As such, if you haven't already noticed, I try to live without using factory-made chemicals, especially for household cleaning. Anything that has names like "Sun Fresh!" or "Lavender Fields" means "ew!" for me.
It can be a point of contention in our house, as my very patient partner grew up with his laundry neatly folded and placed in drawers; every time he'd pull out a new shirt it would smell like "Soft Linen" or something like that. He's come to associate these kinds of smells with "being clean".
But if something is clean, I argue, it wouldn't smell like anything. It would be sterile, no scent. Definitely a far cry from that bouncing bear on a stack of towels selling his "Rainforest"-scented detergent on TV (whose products, like most, contain scents that are chemically engineered and according to studies, contain toxic materials and potential carcinogens).
Anyway, clean doesn't have a smell.
Now, to the reason I'm posting. Nuts!
Soap nuts, that is. They're actually a fruit, but they're called nuts. The outer shell of the fruit called the soapnut contains saponin, a natural substance
known for its ability to cleanse and wash. Soap nuts certainly are not new on the market; they have been used to clean all kinds of fabric
for centuries, before big-name brands started pushing their scented ideas of clean on us.
Do they work? In short, yes. Though to be honest with the powerful washing machines that are commonplace in households today, we probably don't need any soap at all - hot water does magical things. But I do use soap nuts on my clothes for everyday kinds of washings, and unless something is stained it works great! For stains I use baking soda and liquid soap as a pre-wash. Combined with white vinegar as a fabric softener, my clothes come out smelling like... nothing. Just the way it should be - and for a fraction of the cost!
You can find soap nuts in natural food stores or online. Give them a try!
Happy washing!
It can be a point of contention in our house, as my very patient partner grew up with his laundry neatly folded and placed in drawers; every time he'd pull out a new shirt it would smell like "Soft Linen" or something like that. He's come to associate these kinds of smells with "being clean".
But if something is clean, I argue, it wouldn't smell like anything. It would be sterile, no scent. Definitely a far cry from that bouncing bear on a stack of towels selling his "Rainforest"-scented detergent on TV (whose products, like most, contain scents that are chemically engineered and according to studies, contain toxic materials and potential carcinogens).
Anyway, clean doesn't have a smell.
Now, to the reason I'm posting. Nuts!
 |
| Soap nuts! |
Do they work? In short, yes. Though to be honest with the powerful washing machines that are commonplace in households today, we probably don't need any soap at all - hot water does magical things. But I do use soap nuts on my clothes for everyday kinds of washings, and unless something is stained it works great! For stains I use baking soda and liquid soap as a pre-wash. Combined with white vinegar as a fabric softener, my clothes come out smelling like... nothing. Just the way it should be - and for a fraction of the cost!
- They are simply a dried fruit -- 100% totally natural AND compostable!
- They are organically grown and are free of harsh chemicals, so they are incredibly gentle. (This makes them especially great for those with sensitive skin — including babies and those that suffer from allergies, eczema, and psoriasis).
- They’re totally biodegradeable, so they’re better for the environment than regular detergent.
- They’re antimicrobial, so they’re even good for septic and greywater systems.
- They are low-sudsing -- exactly what you need for HE (or high-efficiency) washers.
 |
| Soap Nuts! |
Happy washing!
Saturday, October 29, 2011
Make Your Own Mosquito Repellent, bzzzzz
It's still mosquito season here, as it's nearly 70 degrees (Fahrenheit, that's about 22C) here on the southern coast of France. Mosquitoes love me so much, and I cannot say that this infatuation is reciprocal. Mosquitoes are attracted by body heat, carbon dioxide (which we exhale),
movement, moisture, sound, and dark colors - are you kidding me?
Basically they're attracted to everything! Just hearing that light buzz around my head is enough to keep me awake all night! Ahhh! What to do, what to do?
I've used plenty of sprays and balms and whatnot. I've heard about why it's not okay to use products containing DEET (a chemical developed by the US Army following WWII as a crop pesticide - not only can it cause damage to the central nervous system but it can melt some plastics) and in fact I don't/won't use it. So, a no-chemical insect repellent is what I'm looking for. I can certainly make one myself!
 I ordered up some essential oils that are known for keeping the skeeters at bay (left, eucalyptus and rosemary) and added one dram (each of these bottles is one dram) into a spray bottle with 40-50ml of jojoba oil. Presto bingo! After shaking it up and spraying it on, I smelled like a eucalyptus tree that would be way too unappealing for mosquitoes and my skin was super soft. I win! Cost: under $5.
You can make your own mosquito repellent by using the same recipe as mine or by using a different carrier oil or essential oil.
Carrier oils: basically any oil that can be used on the body would do, if relatively unscented. Water can work too.
Essential oils: some of the oils known to repel mosquitoes are eucalyptus, rosemary, lemongrass, thyme, pennyroyal, and lavender.
BONUS: if you have an electric diffuser (the kind that plug into the wall and diffuse a scent) you can use this solution as a diffusing liquid as well. Would be great in a home with kids!
I've used plenty of sprays and balms and whatnot. I've heard about why it's not okay to use products containing DEET (a chemical developed by the US Army following WWII as a crop pesticide - not only can it cause damage to the central nervous system but it can melt some plastics) and in fact I don't/won't use it. So, a no-chemical insect repellent is what I'm looking for. I can certainly make one myself!

You can make your own mosquito repellent by using the same recipe as mine or by using a different carrier oil or essential oil.
Carrier oils: basically any oil that can be used on the body would do, if relatively unscented. Water can work too.
Essential oils: some of the oils known to repel mosquitoes are eucalyptus, rosemary, lemongrass, thyme, pennyroyal, and lavender.
BONUS: if you have an electric diffuser (the kind that plug into the wall and diffuse a scent) you can use this solution as a diffusing liquid as well. Would be great in a home with kids!
Sunday, October 23, 2011
How to Make Your Own Reed Diffuser
These diffusers are getting so popular - I haven't ever bought one because I was afraid of what chemicals might be lurking in the liquid, but I was given one by my sister-in-law last year. I tried it out. It worked fairly well. But they're so expensive to buy! So I thought, there must be a way to use essential oils (no unknown chemicals to worry about) and make my own for way, way less, right?
Right!

So here's a little how-to, to make your own diffuser, chemical-free.
1. Choose a glass (or glazed ceramic) container, ideally with a smaller neck. You may have a perfect container around the house... an old small olive oil bottle perhaps? Check your glass recycle bin!
2. Choose an essential oil. Essential oils are extracts of plants (removed by distillation) and flowers, so no chemicals are involved in any way. You can find a list of essential oils here; some of the nicer ones for home use include almond, cinnamon, jasmine, lavender, orange, rose and lemon. Note: you can also soak plants/flowers in your carrier solution for a week and use the final product as your diffusing liquid.)
3. Next, you'll need to choose a carrier solution. The idea is to "water down" your essential oils with a different liquid so that it can diffuse more easily. You can use any combination of perfumer's alcohol, rubbing alcohol, dipropylene glycol, vodka, jojoba oil, vegetable oil, mineral oil -alcohol helps oil bases to flow easier. You want the reeds, which will be placed in the liquid, to be able to "suck up" the liquid and therefore diffuse its odor. Mix your essential oils into your carrier solution until you get a strong scent.
4. Place 6 (or more) reeds in the liquid, making sure they stick out of the vase/bottle at least 3-4 inches. Bamboo skewers (with the tips cut off) may also work. If it appears that the solution is not traveling up the reeds, add more alcohol to your solution and stir thoroughly.
That's it! Now you have a natural diffuser for your home that is safe - though remember yours may be flammable, and make sure to keep the diffuser out of reach from little hands and paws!
Good luck and happy crafting!
Right!

So here's a little how-to, to make your own diffuser, chemical-free.
1. Choose a glass (or glazed ceramic) container, ideally with a smaller neck. You may have a perfect container around the house... an old small olive oil bottle perhaps? Check your glass recycle bin!
2. Choose an essential oil. Essential oils are extracts of plants (removed by distillation) and flowers, so no chemicals are involved in any way. You can find a list of essential oils here; some of the nicer ones for home use include almond, cinnamon, jasmine, lavender, orange, rose and lemon. Note: you can also soak plants/flowers in your carrier solution for a week and use the final product as your diffusing liquid.)
3. Next, you'll need to choose a carrier solution. The idea is to "water down" your essential oils with a different liquid so that it can diffuse more easily. You can use any combination of perfumer's alcohol, rubbing alcohol, dipropylene glycol, vodka, jojoba oil, vegetable oil, mineral oil -alcohol helps oil bases to flow easier. You want the reeds, which will be placed in the liquid, to be able to "suck up" the liquid and therefore diffuse its odor. Mix your essential oils into your carrier solution until you get a strong scent.
4. Place 6 (or more) reeds in the liquid, making sure they stick out of the vase/bottle at least 3-4 inches. Bamboo skewers (with the tips cut off) may also work. If it appears that the solution is not traveling up the reeds, add more alcohol to your solution and stir thoroughly.
That's it! Now you have a natural diffuser for your home that is safe - though remember yours may be flammable, and make sure to keep the diffuser out of reach from little hands and paws!
 |
| (my) reed diffuser |
Good luck and happy crafting!
Friday, October 21, 2011
Composting: It's Not Just for Yards Anymore
So many of you may have noticed, I live in France (yes, croissants, cheese, yada yada). Up until a few weeks ago I lived in Paris in a tiny apartment with a little ledge of a balcony (I wouldn't even call it a balcony). Now we live in Marseille, on the ocean (whew!) but we're back to no-balcony status, just an extended window-sill. The point is, no yard. And we're nowhere near even thinking about yards, though I do swoon when I see pictures of homes for sale in the area that sit on their own apple orchard... apple cider? Apple pie! Cinnamon apple muffins. Oh, I could love me some apple trees!
But I digress. As a transplant from Portland, Oregon and a lover of the Earth, I've been dealing with an "issue" for a while which is the following: how the heck do I compost in my small place? I used to be able to throw my goods into my big black bin in the corner of my backyard where it would happily decompose thanks to worms (and my plants sure did love the result). But now this is a near-impossible feat, as there isn't any room for a bin and the thought of having the worms in a bin in the house... with a cat who would surely get into them and leave us with worms all over the house. (This is the cat who, one night, was able to open our aquarium, eat 13 small shrimp and almost close it back up completely - we were never the wiser until we realized that a shrimp rapture probably did not happen. Horrible.)
So, how do I compost without worms and without a yard? Is this even possible?
Well yes, yes it is. And as a benefit, I have a window ledge and that appears to be just enough space to work this out. So let's learn a bit about composting!
First off, you need to build or buy your "box". It doesn't need to be a box per se, but a suitable container that can close effectively and has ventilation. Any container you're not using would work just fine (bonus if it's clear - it lets the sunlight in even if it is closed), as long as there are holes in it and it will be convenient for you to "turn" it (basically, stirring it). For a smaller home bin a small shovel (think the kind you might use at the beach to make sandcastles) would be great, very small compost bins would do fine with just shaking the bin/box with the lid closed.
For what goes into the compost bin: there needs to be a balanced carbon to nitrogen ratio, which means you'll need to layer "brown" materials (like straw, shredded paper, wood shavings and/or dry weeds, etc) with your "green" materials (vegetable scraps, green weeds, etc.) and garden soil or finished compost. The pile needs to be kept damp and under the sun! If it gets stinky, stir it up! It will help aerate the pile with oxygen. Adding lime is a good trick to keep smells (and insects!) at bay.
 Layer up your compost bin (the base should be soil) and make sure it sits under the sun or near a sunlit window. Heat speeds the process up! As you keep adding to your compost pile you'll find which things decompose quickly and which don't, allowing you to change your levels of brown and green materials to encourage decomposition.
Voila! Be patient. In time you'll have a rich soil that will be perfect for your herb seedlings!
Good luck and happy composting!
photo credits: Ellen Levy Finch, Pfctdayelise
 |
So, how do I compost without worms and without a yard? Is this even possible?
Well yes, yes it is. And as a benefit, I have a window ledge and that appears to be just enough space to work this out. So let's learn a bit about composting!
First off, you need to build or buy your "box". It doesn't need to be a box per se, but a suitable container that can close effectively and has ventilation. Any container you're not using would work just fine (bonus if it's clear - it lets the sunlight in even if it is closed), as long as there are holes in it and it will be convenient for you to "turn" it (basically, stirring it). For a smaller home bin a small shovel (think the kind you might use at the beach to make sandcastles) would be great, very small compost bins would do fine with just shaking the bin/box with the lid closed.
For what goes into the compost bin: there needs to be a balanced carbon to nitrogen ratio, which means you'll need to layer "brown" materials (like straw, shredded paper, wood shavings and/or dry weeds, etc) with your "green" materials (vegetable scraps, green weeds, etc.) and garden soil or finished compost. The pile needs to be kept damp and under the sun! If it gets stinky, stir it up! It will help aerate the pile with oxygen. Adding lime is a good trick to keep smells (and insects!) at bay.

Voila! Be patient. In time you'll have a rich soil that will be perfect for your herb seedlings!
Good luck and happy composting!
photo credits: Ellen Levy Finch, Pfctdayelise
Tuesday, October 18, 2011
How to Give New Life to Old Soap
You may, like me, use bars of soap. (My new favorite? My savon de Marseille bar in violet! yum!!).
It's always frustrating to get the the end of the soap bar, you know -
when it's too small to be used comfortably in your hands but too big to
justify throwing it away. What to do, what to do...
... turn it into a new bar of soap!
It turns out you can put all of your old soaps into a new soap pretty easily. Here is how!
 4. Scoop the mixture into a pre-oiled mold and let the mixture set. (Silicon cupcake molds or similar will work great too!)
5. When it is dry and hardened, pop it out and voila! New soap.

This was loosely taken from the wonderful La Saponaria site, run by Italian soapmakers Luigi and Lucia, who make natural soaps from local ingredients.
Have fun!
 |
| (my new favorite!) |
... turn it into a new bar of soap!
It turns out you can put all of your old soaps into a new soap pretty easily. Here is how!
- Collect all the leftover pieces of soap in one place. When you have enough to make a viable piece of soap, either crumble them (they must be dry) with a mixer (hand-held or otherwise) or chop them into small pieces with a knife.
- Put the pieces into a container (glass is ideal) and construct a water bath. You can add just a pinch of water to your soap mixture.
- Bring the water to a boil and make sure to stir your soap mixture. When the mixture is smooth (dough-like, will likely be a bit "bumpy"), it is ready to pour (or scoop).
5. When it is dry and hardened, pop it out and voila! New soap.
This was loosely taken from the wonderful La Saponaria site, run by Italian soapmakers Luigi and Lucia, who make natural soaps from local ingredients.
Have fun!
Friday, October 14, 2011
Say YES to Cloth Diapers!
Disposable diapers: the invention of the century for busy moms. They come folded up neatly in plastic packaging, they do their job, then they are tossed in the trash to never be seen again. With a market of nearly seven billion dollars a year, you can bet that Huggies isn't going out of business soon. But those commercials with happy babies crawling around in their Pampers don't tell you the real truth: what's best for your baby and the earth is to never use them.
 Disposable diapers don't biodegrade, so they sit in landfills - about 25 billion of them in the US a year. They're the third largest consumer product in landfills at this very moment, taped shut with babies' solid waste trapped inside. Gah. (For the record, disposable diaper companies instruct diaper users to put all fecal matter in the toilet before discarding the diaper, but no one does.)
Some other amazing facts about disposables?
"Disposable diapers contain traces of Dioxin, an extremely toxic by-product of the paper-bleaching process. It is a carcinogenic chemical, listed by the EPA as the most toxic of all cancer-linked chemicals. It is banned in most countries, but not the U.S.
Disposable diapers contain Tributyl-tin (TBT) - a toxic pollutant known to cause hormonal problems in humans and animals.In May 2000, the Archives of Disease in Childhood published research showing that scrotal temperature is increased in boys wearing disposable diapers, and that prolonged use of disposable diapers will blunt or completely abolish the physiological testicular cooling mechanism important for normal spermatogenesis." - Real Diaper Association
So if you're not using disposable diapers, what do you use?
 Cloth diapers!
 Moms swear by them. No diaper rashes, no irritation, no stinky trash, no problem. Sure, you've got to do a little extra work by spraying some poop into the toilet but it protects your baby, saves you money, and has little impact on the environment (unlike disposables).

Also check out Etsy if you're interested in supporting other moms who have small cloth diaper businesses.
:-)
Thursday, October 13, 2011
Turn an Old Tee-Shirt Into Your New Favorite Bag
As some of you may know, I love finding new ways to use old tee-shirts. As of recently I am starting to use them to make collars for dogs and cats, but I've found plenty of ways to reuse those shirts that can't bare to be parted with yet stay in the closet for years.


Yep, all made with tee-shirts! But it's not just about jewelry, you can turn your favorite old shirt into a tote bag, making it usable again to bring all of your fresh fruits and veggies home.
 |
| Aren't these cute?! |
I've posted a few other tutorials that I've made myself on here; I've just moved and I've only unpacked the necessities at the moment so I'm going to have to point you to a tutorial that was made by someone else. BUT! These are so easy to make, I would have just written the same thing. :-)
So if you've got a few extra tees and minutes to spare, try your hand at this super easy tee-shirt bag tutorial! The best reason for making these? You won't have to use plastic bags when you go to the store! And you'll look cool because everyone will know that you're doing your part in saving the environment.
Also hit up this site for 35 free patterns for reusable totes! Holy moly, I'm going to have a field day once my sewing machine is up and running again.
I'd love to see your versions!
Happy crafting!
Thursday, October 6, 2011
Don't Sweat It! ... or Should You?
Sweating: it's natural, it's our body's way of cooling off, as it produces perspiration which evaporates in an awesome form of thermoregulation. Toxins and trace amounts of elements are released in sweat, but it mostly contains water. That's why it's so important to drink lots of water when it gets hot or when exercising.
At some point we as a society decided that sweating was unacceptable. Why can't we sweat? It's not attractive, apparently. It's not normal. Embarrassing, even. So this product called antiperspirant came onto the market, grouped in with deodorants. And it was magical, because they made armpits all over the world sweat-free.
Okay, well it wasn't really magical, no one waved their wands over armpits and declared them sweat-free. There was a pretty serious science behind it, one that involved some of those elements (from the table of elements, remember? From science class?). Anyway, basically antiperspirants block sweat glands from producing sweat - think of it like putting a very small cork into your pores. It does this with aluminum (yes, like foil), in many forms (alumimum chloride, aluminum chlorohydrate, aluminum-zirconium, aluminum zirconium tetrachlorohydrex, Aluminum hydroxybromide and aluminium zirconium trichlorohydrex gly to be exact). When the aluminum is drawn into the sweat glands, water passes in too. As more water goes in, the cells begin to swell, pushing the ducts shut so that sweat can't escape. Voila.
So no biggie then, what an awesome discovery! Well, hold on... there are a few disputed facts about aluminum in your body that you may want to know about.
Firstly, you could develop a rash. No big deal, just stop using the antiperspirant and it will pass. Oh, but, aluminum is a neurotoxin and can damage your DNA... well, that's kind of a big deal. Not to mention, an increased amount of aluminum is present in the brains of Alzheimer's patients, and using aluminum-filled antiperspirants certainly builds up the amount of aluminum in the body. It's also linked with renal failure and breast cancer.
 So what's it really worth to you to not sweat?
If you want to go aluminum-free, make sure to check the ingredients on your deodorant and make sure aluminum in its many forms and compounds is not included. Alum, on the other hand, is okay!
Bonus fact: antiperspirants cause those icky yellowish "sweat" stains on your shirts - it's not from sweat at all!
At some point we as a society decided that sweating was unacceptable. Why can't we sweat? It's not attractive, apparently. It's not normal. Embarrassing, even. So this product called antiperspirant came onto the market, grouped in with deodorants. And it was magical, because they made armpits all over the world sweat-free.
 |
| One of the first antiperspirants, Everdry |
So no biggie then, what an awesome discovery! Well, hold on... there are a few disputed facts about aluminum in your body that you may want to know about.
Firstly, you could develop a rash. No big deal, just stop using the antiperspirant and it will pass. Oh, but, aluminum is a neurotoxin and can damage your DNA... well, that's kind of a big deal. Not to mention, an increased amount of aluminum is present in the brains of Alzheimer's patients, and using aluminum-filled antiperspirants certainly builds up the amount of aluminum in the body. It's also linked with renal failure and breast cancer.
If you want to go aluminum-free, make sure to check the ingredients on your deodorant and make sure aluminum in its many forms and compounds is not included. Alum, on the other hand, is okay!
Bonus fact: antiperspirants cause those icky yellowish "sweat" stains on your shirts - it's not from sweat at all!
Monday, October 3, 2011
An Uninhabited Island in the Pacific... Made of Trash?
Did you know that there is an unexplored island in the Pacific Ocean?
Why yes, this would be the Great Pacific Garbage Patch, also known as the Pacific Trash Vortex, a floating conglomeration of plastic, chemical sludge and trash that the Earth cannot digest, between Hawaii and California. Basically, when trash is deposited into the ocean, currents find their ways of pushing it into a certain spot where it remains trapped, and voila, a new island.
The Pacific Trash Vortex's size ranges from 700,000 square kilometers (270,000 sq mi) to more than 15,000,000 square kilometers (5,800,000 sq mi) (0.41% to 8.1% of the size of the Pacific Ocean), or, in some media reports, from the size of Texas up to twice the size of the continental United States (wikipedia). Oh yes, this is what it has come to.
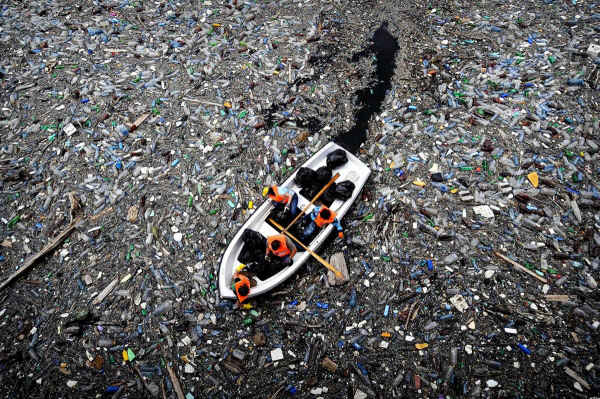
…do you see your trash floating around in there?
Plastic remnants big and small bob in the water and birds and turtles, mistaking them for food (the turtles often for jellyfish and birds for fish), eat them. Let me assure you, birds and turtles were not designed to eat plastic; what you end up with are dead birds and turtles.
So no one is taking responsibility for this, of course. No one is doing anything to clean it up, really. No one really seems to care much at all. And with all the petroleum being used to make the plastic, you can be sure that plastic production won’t be slowing down anytime soon. Not to mention, this isn't the only trash vortex - the North American Garbage Patch and the Indian Ocean Garbage Patch are just as bad.
But you, dear readers, you can help.
Please reduce your plastic consumption and make sure all recyclables get into their appropriate bins - and make sure you take the pledge to refuse single-use plastics! You can also visit The Great Garbage Patch site for more information.
Why yes, this would be the Great Pacific Garbage Patch, also known as the Pacific Trash Vortex, a floating conglomeration of plastic, chemical sludge and trash that the Earth cannot digest, between Hawaii and California. Basically, when trash is deposited into the ocean, currents find their ways of pushing it into a certain spot where it remains trapped, and voila, a new island.
The Pacific Trash Vortex's size ranges from 700,000 square kilometers (270,000 sq mi) to more than 15,000,000 square kilometers (5,800,000 sq mi) (0.41% to 8.1% of the size of the Pacific Ocean), or, in some media reports, from the size of Texas up to twice the size of the continental United States (wikipedia). Oh yes, this is what it has come to.
…do you see your trash floating around in there?
Plastic remnants big and small bob in the water and birds and turtles, mistaking them for food (the turtles often for jellyfish and birds for fish), eat them. Let me assure you, birds and turtles were not designed to eat plastic; what you end up with are dead birds and turtles.
 |
| 317 articles of plastic found inside a dead turtle's digestive system |
 |
| Sea turtle stuck in plastic bags |
So no one is taking responsibility for this, of course. No one is doing anything to clean it up, really. No one really seems to care much at all. And with all the petroleum being used to make the plastic, you can be sure that plastic production won’t be slowing down anytime soon. Not to mention, this isn't the only trash vortex - the North American Garbage Patch and the Indian Ocean Garbage Patch are just as bad.
But you, dear readers, you can help.
Please reduce your plastic consumption and make sure all recyclables get into their appropriate bins - and make sure you take the pledge to refuse single-use plastics! You can also visit The Great Garbage Patch site for more information.
Thursday, September 29, 2011
Tattoos Are Made From... Bones and Animal Fat? Oh, Ew.
Oh my, do I love tattoos. I adore seeing beautifully artistic tattoos on strangers' forearms and admiring them like some women admire babies. It also makes me wish I was a little more proficient at drawing, because stick figures aren't really considered "art" these days.

I would love to have half-sleeves without regret, but I'm taking my time and making careful decisions. Of course while looking into tattoos and inks, I discovered some interesting information about "Bone Black", the most commonly used tattoo ink.
Bone Black is a black pigment, called such because it is made from burning animal bones into charcoal, which is then turned into tattoo ink by adding a carrier solution (made with glycerin, which can be made from vegetable sources but is usually made from animal fats). Oh god, gross. Cannot have that on my body, never. I think this is one of those things that no one really talks about, but really, we should. Tattoos are awesome, but to have my skin full of burned bones and animal fat... no, no thank you.
So what are some options to consider when you finally are ready to get that tattoo but you don't want permanent remnants of dead animals in your skin?
You can find your nearest vegan or vegan-friendly tattoo parlor here:
By the way, all of the above photos were done in vegan ink by the incredibly talented tattoo artist Ryan Mason. He works at Scapegoat Tattoo, vegan tattoo parlor in Portland, Oregon.
Do you have a vegan tattoo? Do you know of a vegan or vegan-friendly tattoo parlor that isn't listed here? Do you have any tattoo tips to share? Please leave a comment! :-)
I would love to have half-sleeves without regret, but I'm taking my time and making careful decisions. Of course while looking into tattoos and inks, I discovered some interesting information about "Bone Black", the most commonly used tattoo ink.
Bone Black is a black pigment, called such because it is made from burning animal bones into charcoal, which is then turned into tattoo ink by adding a carrier solution (made with glycerin, which can be made from vegetable sources but is usually made from animal fats). Oh god, gross. Cannot have that on my body, never. I think this is one of those things that no one really talks about, but really, we should. Tattoos are awesome, but to have my skin full of burned bones and animal fat... no, no thank you.
So what are some options to consider when you finally are ready to get that tattoo but you don't want permanent remnants of dead animals in your skin?
- Talk to your tattoo artist. Ask them what kind of inks and carrier solutions they use in their shop. Do they mix their own? Or do they buy it pre-mixed? If they don't want to talk to you about what inks they use, chances are they are not the right artist for you.
- Ask your tattoo artist to use vegan (animal-free) inks and glycerin made from vegetable sources for your tattoo. You may need to add a little more money to your cost to cover the expense of ordering the items if they don't have them already.
- Find a vegan tattoo artist. Vegans do not eat or consume any product or by-product of animals, so you can be sure that they will be knowledgeable about inks and carrier solutions.
- If you can't locate a vegan tattoo artist, find a vegan tattoo parlor. They'll only use inks that do not have any animal products and will also have aftercare products that are vegan. They can recommend an artist to you that would best suit your needs.
You can find your nearest vegan or vegan-friendly tattoo parlor here:
By the way, all of the above photos were done in vegan ink by the incredibly talented tattoo artist Ryan Mason. He works at Scapegoat Tattoo, vegan tattoo parlor in Portland, Oregon.
Do you have a vegan tattoo? Do you know of a vegan or vegan-friendly tattoo parlor that isn't listed here? Do you have any tattoo tips to share? Please leave a comment! :-)
Tuesday, September 27, 2011
Feature: StrappyKincaid
Today I present to you, dear readers, the lovely Jen Lee, the talented woman behind StrappyKincaid!


Tell us a little bit about you!
I'm Jen and I live in Portland, Oregon with my lovely husband and our 3 rescue dogs. My husband is my biggest support and cheerleader and the dogs are... really great "helpers". I have a demanding and stressful 9 to 5 job, so designing and creating are wonderfully necessary outlets for me. This past June I started a business I named StrappyKincaid. I see StrappyKincaid as my alter-ego- a unique individual that wears "sassy accessories" (that are sometimes quite racy).
If you're not making things, what would we most likely find you doing?
When I'm not working for the man at my day job or in my little studio
space, I'm most likely on the hunt for heart-shaped rocks to add to my
burgeoning collection, checking out style blogs for inspiration,
people-watching, running, hiking, or (weather permitting) drinking a
beer outside. (OK, I'll be honest, I'm usually walking a dog to a place
to drink beer, going out for a beer to reward myself after a run, or
hitting a pub in a small town....for a beer! after a long hike. I prefer
IPA's, by the way.)
What does your creative process look like?
My creative process is peripatetic. It's bursts of overly-ambitious inspiration and a lot of trial and error, topped off with a touch of patience and loads of persistence. I'm a perfectionist and I find that those bursts allow me to take risks without becoming paralyzed by my fear of making mistakes. I spent a lot of my life not creating art because of that fear and I've had to let it go and not judge my work so harshly. The really wonderful side effect is that's opened me up to non-judgment in all areas of my life and made me a much more joyful human. If I get nothing else out of my business, I hope to inspire people to take risks and truly, truly participate in life.
 Do you have any eco-friendly tips to share?
My husband is my real inspiration when it comes to all things eco-friendly. Up until I met him 4 years ago I'd recycled, sure, but I'd always enjoyed the idea of being eco-friendly more than the execution. I have utmost respect for his sensitivity to the environment and have settled into a REDUCE/REUSE mantra, while he's the resident RECYCLE guru. My reduce/reuse mentality has permeated my whole world and become a part of my normal thought process. When shopping for materials for my designs, I first look for scrap or surplus materials, then for materials that can be re-worked such as leather skirts or leather jackets from thrift stores. Who knew that bad '80's fashion would work surprisingly well for handbags and jewelry? I've found that scrap upholstery leather is great for belts and my leg coverings (left, worn by a model at Portland's annual Modified Style show) - it's flexible, durable, soft and comes in great colors. I'm also always on the lookout for hardware that can be re-purposed-- o-rings, d-rings and buckles off old dog collars, leashes, harnesses, that sort of thing. When you tweak your mind to that "reuse" mindset it's amazing how much you can find to reuse!
Hop on over to StrappyKincaid's Etsy shop to peruse Jen's lovely creations, and while you're there make sure you use your exclusive coupon for 15% off any item by entering the coupon code SKPP11!

You can also stay up to date with news and information on the StrappyKincaid FaceBook page.

Tell us a little bit about you!
I'm Jen and I live in Portland, Oregon with my lovely husband and our 3 rescue dogs. My husband is my biggest support and cheerleader and the dogs are... really great "helpers". I have a demanding and stressful 9 to 5 job, so designing and creating are wonderfully necessary outlets for me. This past June I started a business I named StrappyKincaid. I see StrappyKincaid as my alter-ego- a unique individual that wears "sassy accessories" (that are sometimes quite racy).
If you're not making things, what would we most likely find you doing?
What does your creative process look like?
My creative process is peripatetic. It's bursts of overly-ambitious inspiration and a lot of trial and error, topped off with a touch of patience and loads of persistence. I'm a perfectionist and I find that those bursts allow me to take risks without becoming paralyzed by my fear of making mistakes. I spent a lot of my life not creating art because of that fear and I've had to let it go and not judge my work so harshly. The really wonderful side effect is that's opened me up to non-judgment in all areas of my life and made me a much more joyful human. If I get nothing else out of my business, I hope to inspire people to take risks and truly, truly participate in life.
 |
| A few StrappyKincaid creations |
 Do you have any eco-friendly tips to share?
 My husband is my real inspiration when it comes to all things eco-friendly. Up until I met him 4 years ago I'd recycled, sure, but I'd always enjoyed the idea of being eco-friendly more than the execution. I have utmost respect for his sensitivity to the environment and have settled into a REDUCE/REUSE mantra, while he's the resident RECYCLE guru. My reduce/reuse mentality has permeated my whole world and become a part of my normal thought process. When shopping for materials for my designs, I first look for scrap or surplus materials, then for materials that can be re-worked such as leather skirts or leather jackets from thrift stores. Who knew that bad '80's fashion would work surprisingly well for handbags and jewelry? I've found that scrap upholstery leather is great for belts and my leg coverings (left, worn by a model at Portland's annual Modified Style show) - it's flexible, durable, soft and comes in great colors. I'm also always on the lookout for hardware that can be re-purposed-- o-rings, d-rings and buckles off old dog collars, leashes, harnesses, that sort of thing. When you tweak your mind to that "reuse" mindset it's amazing how much you can find to reuse!
Hop on over to StrappyKincaid's Etsy shop to peruse Jen's lovely creations, and while you're there make sure you use your exclusive coupon for 15% off any item by entering the coupon code SKPP11!
You can also stay up to date with news and information on the StrappyKincaid FaceBook page.
Monday, September 26, 2011
It's International Rabbit Day!
I have a dog and cat whom I love a lot (even if the cat wasn't planned, he was found on the street as a small ball of fur in the wee hours of the morning last May); the cat thinks the dog is his mother and the dog thinks the cat is a royal pain (even though she did let him "nurse" for six months). Finally she weaned him, thank goodness. She has such a big heart.
I suppose she has a big heart because this isn't the first furry companion in need of a little extra loving. She had Apple, an adopted Netherland Dwarf rabbit who had a fierce appetite for dandelions and made his rabbit lair behind a mirror in a corner. He was the coolest of cool rabbits. Once he had a really intense fight with a red plastic cup, he liked to wait on the couch for the mail lady to come by, and he would always try (often successfully) to drink my coffee (he could smell it coming and as soon as I set my mug down he would be in it, literally). They shared carrots that I carefully distributed and Apple decided once that he should sleep in the dog's bed with her, and after a bit of grunting and rearranging, they made it happen.
Isn't that a handsome bunny? Ollie the pug and I agree, we love rabbits. We love their cute little tails and their noses when they sniff things and how they do those cute little running jumps when they're excited. We also think a lot of people don't realize how awesome rabbits are, that they can use a litter box and that they are great companions. Who wouldn't want to share a big spinach salad with a bunny? Count me in!

So we're celebrating International Rabbit Day by sharing that bunnies are so dear to our hearts and we hope that if you're looking for a companion that you would consider adopting a rabbit who is looking for their forever home. Contact your local humane society and check out this website for more info on adopting! You'd make somebunny very happy. :-)
 | |||||||||
| I wasn't kidding. |
I suppose she has a big heart because this isn't the first furry companion in need of a little extra loving. She had Apple, an adopted Netherland Dwarf rabbit who had a fierce appetite for dandelions and made his rabbit lair behind a mirror in a corner. He was the coolest of cool rabbits. Once he had a really intense fight with a red plastic cup, he liked to wait on the couch for the mail lady to come by, and he would always try (often successfully) to drink my coffee (he could smell it coming and as soon as I set my mug down he would be in it, literally). They shared carrots that I carefully distributed and Apple decided once that he should sleep in the dog's bed with her, and after a bit of grunting and rearranging, they made it happen.
 |
| Apple and Ollie share the bed |
Isn't that a handsome bunny? Ollie the pug and I agree, we love rabbits. We love their cute little tails and their noses when they sniff things and how they do those cute little running jumps when they're excited. We also think a lot of people don't realize how awesome rabbits are, that they can use a litter box and that they are great companions. Who wouldn't want to share a big spinach salad with a bunny? Count me in!
So we're celebrating International Rabbit Day by sharing that bunnies are so dear to our hearts and we hope that if you're looking for a companion that you would consider adopting a rabbit who is looking for their forever home. Contact your local humane society and check out this website for more info on adopting! You'd make somebunny very happy. :-)
Saturday, September 24, 2011
CFLs: To Use or Not to Use?

The light bulb: sexy, sleek, fragile. In use for over a hundred years, these have been lighting homes with their conductive filaments. Simple to use, with colored, white or clear glass, these have been a staple of households since most of us can remember. Screw it in, it lights up. Simple! Magic!
Thanks to engineers looking for an ever-growing number of ways to reduce global energy use, the CFL (compact fluorescent light) was introduced with glowing (ha!) reviews; they last 8 to 15 times longer than our sexy incandescent bulbs and use 20-33% less energy. Well! Here's a great way to save the planet, right?
Well... maybe.
CFLs, like all fluorescent lamps (not our sexy bulbs), contain mercury as vapor inside their glass tubing. (You know what they look like, right? Here's one.)

Spirals. Hmm. But hey, saving energy helps you save money on utility bills and protects the environment by reducing greenhouse gas emissions, right?
So anyway, CFLs generally contain about 3–5 mg of mercury per bulb, with the eco-friendly bulbs containing as little as 1 mg. Why are we even talking about mercury? Well, if you didn't know, it is poisonous. That's why we don't really use those thermometers anymore with the mercury in them, because if it breaks and comes in contact with your skin, you could um... die.
Okay, so since mercury is poisonous and CFLs contain mercury, these spiraled bulbs (can we call them bulbs? It seems unfair) need to be handled and disposed of with care. For example, if a CFL breaks you should open windows in the room immediately to air out the mercurial vapor and carefully put the broken pieces in a jar, sealing it tightly (mercury can leech from a plastic bag). If your CFL stops working, you shouldn't throw it away with your trash (the mercury may be released and contribute to air and water pollution) but recycle them.
Recycle them, okay. But how?
CFLs fall into the WEEE recycling scheme (Waste Electrical and Electronic Equipment Directive) and the higher price that you pay for a CFL already includes the cost of recycling it. Manufacturers and importers have an obligation to recycle these guys, so you better get them back to where they came from. In the US, you can bring them to most Home Depot locations.
Well that kind of seems like a lot of work and I don't really like the idea of introducing mercury into my home or the environment. Plus, they don't fit in a lot of current lighting fixtures and they don't work well in low temperatures. So I'll stick with my sexy bulbs please.
Oh wait - I don't have a choice??
In 2008, the European Union approved regulations to start phasing out incandescent bulbs by end of 2012. Australia, Canada, and the United States have started planning a ban on most current incandescent bulbs. It looks like slowly but surely, the world will be getting rid of our bulbs and replacing them with spirals.
With the mercury you'll be obligated to bring into your home, please make sure to get your old and broken CFLs to a proper recycling center where they can be disposed of safely and their glass recycled. It's the only way that we can prevent doing harm to the environment - and ourselves - while cutting back on our energy use. CFLs do NOT belong in the trash, they are hazardous waste! But you will see a reduction in your energy bill, and using less energy is nothing to sneeze at.
 |
| Old vs. New |
Thursday, September 22, 2011
Tutorial: "Ring Around the Rosy" Necklace from Tee-Shirts (no-sewing!)
How to!
You'll need a tee shirt and a pair of scissors.
 | |
| Cut 14 strips roughly the width of your finger |
 |
| Hold the ends of the strip with both hands and pull out. The strip will roll on itself to make a string. |
 |
| (strips pulled into string) |
 | |
| Wrap the string around your four fingers as such, then make 14 of these. Lay them down on your work surface. |
 |
| Start to tie the loops together with your remaining 2 pieces of string. |
 |
| Tie them all together until all 14 are attached. |
 |
| And there you have it! |
For longer or shorter lengths, just add or subtract the number of loops that you make and attach to your chain.
Good luck and happy crafting!
Wednesday, September 21, 2011
Kibbles be Gone! How to Make Your Own Dog Food
The joys of sharing your home with a dog - the loving, the silliness, the cuddling, the burping (err, I have a pug); they're such great companions. Dogs, like us, need to eat well in order to feel well and live a long, healthy life. Nowadays when dog food is readily available in huge bags at every grocery store, most of us take the easy way out, struggling through the front door with a 25-pound bag of pelleted "Chicken and Carrots". I too have done this, feeling like my dog was somehow proud of me for carrying the sack into the kitchen where it would slowly be depleted that month. But I'll admit (and this is rare): I was wrong.
In fact she was probably dreading the arrival of that huge bag, thinking "oh no, you've got to be kidding me. I haven't pooped in a week thanks to that food!", snorting her way to the backyard to sulk. The reality of processed dog food wasn't really one that at the time I was interested in, but as they say, the more you know...
Commercial dog foods are filled with all sorts of things, and mostly the sorts of things that aren't good for your dog. Like what, you ask? Oh, I'm happy to share!
Okay, so you're probably asking yourself, are there any dog foods that don't contain this crap (quite literally)? There are, you can find a list of some of the top ones here (conversely, a list of the worst ones are here). Are they cheap? Depends. How valuable is your dog's nutrition to you? You may be paying double for that 25-pound bag of food, but in my view, it's worth it.
There is another option however, one that takes a little more effort but your dog will love you SO much that you will probably stay motivated to keep doing it: make your own dog food! It's pretty easy and most importantly, good for your furry companions. If they had opposable thumbs they'd probably be doing it themselves.
A trick to making this a bit easier on yourself is to prepare a week or two of food in one batch, then freeze or refrigerate the rest in individual containers or baggies (be sure to reuse the bags though, pretty please!). Pull out a frozen one in the morning for it to be defrosted by doggy dinner time and you're all set! Your dog will go nuts for this (if your dog is a messy eater, be prepared - depending on the ingredients used you might want to use a newspaper under the bowl unless they're good at cleaning up).
Here are some recipes to peruse! (Note: many contain grains which are not really necessary for dogs in a balanced diet, you can omit them if you'd like and bulk up on the other ingredients. Also make sure to puree the veggies so their nutrients can be fully absorbed!) Additionally, here's a feeding chart to know how much to give your dog.
Chicken and Rice
Turkey "Casserole"
Lamb and Veggies
Meaty "Casserole"
Meatloaf for Dogs
Turkey and Rice
Another Turkey and Rice
Here's a whole bunch of recipes for food and cookies!
Here's a vegan recipe (yes, dogs can thrive without meat!)
I'd love to hear about your experiences going kibble-free, please leave your tips, recipes or comments below!
UPDATE, OCTOBER 21: the dog LOVES her food. The cat is having difficulty adjusting and it's tough going. We're being patient with him and encouraging him. Strange as it seems, though he has meat in his bowl he doesn't know/recognize that it's food. He is so used to eating crunchy pieces of cat food. (Ugh I feel so guilty.)
UPDATE, NOVEMBER 4: Ollie is still massively in love with her homemade food. She goes #2 once a day without difficulty. I've noticed she's been drinking less water but peeing just as much - I think it's because the carrots I use are pureed with water so she's still getting a good water intake. Around 7:30 in the evening she starts the "kitchen sniff", her way of letting me know that she hasn't yet eaten and is waiting EVER so patiently. :-) The cat... still slow going. We've axed the dry food and he took wet food after he refused to eat for three (terrible, horrible) days. He's on wet food now and we're slowly putting more and more chicken in it. Currently he gets about 3/4 tbsp of chicken mixed in with his wet food and it's always gone when I check the bowl... so he's eating it! Hooray!
UPDATE, DECEMBER 5: The dog is going strong. The "dinner dance" has been put into place, which involves running around the house, tail chasing and general craziness when the dog sees me preparing her meal. She gets so excited about it! She's pooping once a day, everything is normal, she seems incredibly healthy and happy. No seizures in 5 weeks, to boot (may not be related). The cat is still getting mixed food, but we're still going strong. He's a tough nut to crack!
In fact she was probably dreading the arrival of that huge bag, thinking "oh no, you've got to be kidding me. I haven't pooped in a week thanks to that food!", snorting her way to the backyard to sulk. The reality of processed dog food wasn't really one that at the time I was interested in, but as they say, the more you know...
Commercial dog foods are filled with all sorts of things, and mostly the sorts of things that aren't good for your dog. Like what, you ask? Oh, I'm happy to share!
- Meat By-Product: this refers to any part of an animal (cow, chicken, etc.) that is not muscle. Essentially, it's heads, feet, tails, things like that. Yes seriously, ground up cow eyeballs in your dog's food. (Note: I'm all for using the entire animal if it must be consumed, however these have no nutritional value for a dog.)
- Digest: either in "poultry digest" or "meat digest" form, is a nice way of saying "roadkill" and "euthanized pets". Yes, seriously - hold back your vomit - you could be feeding your dog ANOTHER DOG!
Okay, so you're probably asking yourself, are there any dog foods that don't contain this crap (quite literally)? There are, you can find a list of some of the top ones here (conversely, a list of the worst ones are here). Are they cheap? Depends. How valuable is your dog's nutrition to you? You may be paying double for that 25-pound bag of food, but in my view, it's worth it.
There is another option however, one that takes a little more effort but your dog will love you SO much that you will probably stay motivated to keep doing it: make your own dog food! It's pretty easy and most importantly, good for your furry companions. If they had opposable thumbs they'd probably be doing it themselves.
A trick to making this a bit easier on yourself is to prepare a week or two of food in one batch, then freeze or refrigerate the rest in individual containers or baggies (be sure to reuse the bags though, pretty please!). Pull out a frozen one in the morning for it to be defrosted by doggy dinner time and you're all set! Your dog will go nuts for this (if your dog is a messy eater, be prepared - depending on the ingredients used you might want to use a newspaper under the bowl unless they're good at cleaning up).
Here are some recipes to peruse! (Note: many contain grains which are not really necessary for dogs in a balanced diet, you can omit them if you'd like and bulk up on the other ingredients. Also make sure to puree the veggies so their nutrients can be fully absorbed!) Additionally, here's a feeding chart to know how much to give your dog.
Chicken and Rice
Turkey "Casserole"
Lamb and Veggies
Meaty "Casserole"
Meatloaf for Dogs
Turkey and Rice
Another Turkey and Rice
Here's a whole bunch of recipes for food and cookies!
Here's a vegan recipe (yes, dogs can thrive without meat!)
I'd love to hear about your experiences going kibble-free, please leave your tips, recipes or comments below!
 |
| (that's my furbaby, Ollie!) |
UPDATE, OCTOBER 21: the dog LOVES her food. The cat is having difficulty adjusting and it's tough going. We're being patient with him and encouraging him. Strange as it seems, though he has meat in his bowl he doesn't know/recognize that it's food. He is so used to eating crunchy pieces of cat food. (Ugh I feel so guilty.)
UPDATE, NOVEMBER 4: Ollie is still massively in love with her homemade food. She goes #2 once a day without difficulty. I've noticed she's been drinking less water but peeing just as much - I think it's because the carrots I use are pureed with water so she's still getting a good water intake. Around 7:30 in the evening she starts the "kitchen sniff", her way of letting me know that she hasn't yet eaten and is waiting EVER so patiently. :-) The cat... still slow going. We've axed the dry food and he took wet food after he refused to eat for three (terrible, horrible) days. He's on wet food now and we're slowly putting more and more chicken in it. Currently he gets about 3/4 tbsp of chicken mixed in with his wet food and it's always gone when I check the bowl... so he's eating it! Hooray!
UPDATE, DECEMBER 5: The dog is going strong. The "dinner dance" has been put into place, which involves running around the house, tail chasing and general craziness when the dog sees me preparing her meal. She gets so excited about it! She's pooping once a day, everything is normal, she seems incredibly healthy and happy. No seizures in 5 weeks, to boot (may not be related). The cat is still getting mixed food, but we're still going strong. He's a tough nut to crack!
Subscribe to:
Posts (Atom)